DIY Info
Please take a look through our DIY Info pages, read our instructions and check out the videos before you order. Please make sure you are comfortable in correctly ordering, assembling & installing your DIY flyscreens before you place your order.
Fly Screens in a Box will cut your fly screen frame and mesh to the size you require and package up everything you need to make your own fly screen.
How to assemble your fly screen
Watch the video above to learn how to measure and assemble your fly screen, or click on a button below to follow the DIY instructions.
Important Info Before You Start DIY
Please note as every window is different, the method of fixing a flyscreen to windows can vary greatly. It is important you decide how or where to fix the flyscreen to your window before you place an order with Fly Screens in a Box. Visit our installation page which explains how to install fly screens on all different types of windows. Fly Screens In a Box is meant as an easy DIY solution to screen standard windows. If you cannot see how to easily fix a flyscreen to your window, it is probably time to call an expert who can professionally install the flyscreen for you. Fly Screens In a Box cannot be responsible for incorrectly measured fly screens.
BEWARE OF HIGH WINDOWS: Fly screens can easily be torn or pushed out under pressure. Flyscreens on high windows do not meet building code due to the risk of window falls. Fly screens should not be installed on any window that opens further than 12.5cm and where the fall to ground (outside the window) is greater than 2 metres. These higher windows require a fall-safe window screen installed by a professional fitter to meet building code.
How To Replace the Mesh In An Existing Fly Screen
If you have an old fly screen where the frame is in great condition however, the mesh is damaged or torn; it is simple to re-mesh with Fly Screens In A Box. Simply measure your existing fly screen following the instructions below, and when choosing “Frame Colour” in your cart select “no frame”. You will be charged less for not selecting a frame and your fly screen mesh will still be cut to size. You will still be sent the components and tools needed to re-mesh your existing fly frame.
Do I Order a 11mm or 9mm Fly Screen Frame?
Most windows in Australia will require 11mm flyscreen frames (the Australian Standard) however, if your windows are from Bradnams or A&L you will require 9mm frames to fit the screens into the channels on the aluminium window frame where the flyscreen will be fitted.
11 mm frames will only fit when the channel provided on the window frame is wider than 11 mm so if you intend on fixing your screens into the window recess then please measure the window frame channel as shown below to ensure it is wider than 11mm.

What Comes In the Box?
- Aluminium Fly Frame in the colour you choose, cut to your measurements
- Fly Screen Mesh (Standard Fiberglass mesh, Pet Proof Mesh, or Bushfire Approved Mesh)
- PVC Spline cut to size (10cm longer than frame)
- Spline Roller & Corner Stakes
- Swivel clips, fixing tabs and plunger pins (only if ordered)
What Do I Need To Make My Own Fly Screen?
- Flat head screwdriver
- Stanley knife
- Mallot (maybe)
How To Measure Your Fly Screen
IMPORTANT NOTES BEFORE YOU MEASURE!
Please click here to view our videos and be sure to read all the below information before placing your order to ensure you order the correct size.
Here at Flyscreens in a Box, we take the mystery out of flyscreens and help the consumer choose, make and instal their own flyscreens. Key to this is measuring the screens correctly so they will fit your windows perfectly. Please follow this simple step by step guide and your fly screens project will be a breeze.
Step 1.
- Choose the correct flyframe size - either 9mm or 11mm.
- If the flyscreen is going to be mounted inside a track or channel, measure the width of the track into which the flyscreen will sit. 11mm is the typical frame used but if the track width is less than 11mm, then you will need the 9mm flyframe. Bradnam’s Windows as an example, all require you to make flyscreens in 9mm framing. See the photo for further clarity.
Step 2.
- Decide on how the fly screen will be mounted. Typically there are three choices, with these being Face Fit, Loose Fit, or Track Fit. Each of these mountings is different with different measurements required so we will go through them in turn.
Shortcut.
- If you are simply replacing or updating an old screen that fitted correctly, then simply measure the old screen’s width and height and record these. Measure each dimension width and height at the corners and in the centre and record the smallest of these for ordering. When recording the measurement add a “W” or an “H” to denote width and height to avoid confusion later. Note that some screens may be bowed in the centre. If this is the case, do not take a measurement in the bowed section as this will make the screens too short.
- Face Fit Mounting.
- In this application the screen is simply mounted against a flat surface and typically held in place with swivel clips. The flat surface may be the window frame, a flat architrave, or anything really that has a minimum of 20mm of contact around the perimeter for the flyscreen to sit against.
- For this application measure the clear height and clear width across the opening in three locations. Take the smallest dimension for the width and add 40mm. This will be the width dimension for the flyscreen. W = Clear Width + 40mm.
- Take the smallest dimension for the height and add 40mm. This will be the height dimension for the flyscreen. H = Clear Height + 40mm. See the diagram for clarity.

- Loose Fit Mounting
- This is the go-to mounting application where face fit mounting is not possible and there are no tracks available for a track fit mounting. The screen is typically held in place using plunger pins to locate and secure the screen in position.
- For this application measure the Clear Width of the opening in 3 locations. Take the smallest of these and deduct 2mm. This will be the manufactured size of the screen. W = Clear Width – 2mm.
- For this application measure the Clear Height of the opening in 3 locations. Take the smallest of these and deduct 2mm. This will be the manufactured size of the screen. H = Clear Height – 2mm.

- Track Fit Mounting.
- In this application, the screen is mounted inside tracks that are found on some aluminium windows. The tracking is almost always at the top and bottom of the screen location and sometimes also on the sides of the windows.
- For the screen Height.
- First measure the depth of the tracks at the top and bottom where the screen will slot into. Usually the top track is deeper than the bottom but that may not always be the case. Take the larger of the track depths and record it as Track Depth TD.

- Next measure the clear height from the top of the lip of the bottom track to the bottom of the lip of the top track at three locations and record the smallest of these as the Clear Height CH

- The Flysceen height is then the Clear Height + Track Depth – 3mm.
- H = CH + TD – 3mm.
- For the screen width, simply repeat the process as for the height with the side tracking.
Pro Tips
- For sliding windows, it is much easier to measure and mount the flyscreen with the glass sash portion of the window removed. Simply slide open the window, lift the sash upwards until it is clear of the bottom track and then tilt the sash out. The bottom of the sash may well be dirty, so if you’re going to sit it on the floor, lay a drop sheet under it first to prevent any damage or dirt staining the floor covering.
- For awning and casement windows, the flyscreen needs to be measured and mounted from a position above the chain winder or window operator. In these instances, pieces of timber or an aluminium angle or adaptor will need to be fitted bringing the bottom of the flyscreen higher to avoid clashing with the operators. Take the vertical measurement from the raised level. Note some window systems already have the adaptor built in, others will need to be made up.
How To Assemble Your Fly Screen
Here at Flyscreens in a Box, we take the mystery out of flyscreens and help the consumer choose, make and instal their own flyscreens. Key to this is assembling the screens correctly so they will fit your windows perfectly. Please follow this simple step by step guide and your fly screens project will be a breeze.
Step 1 – Parts Check
- Check that you have all the parts below for each fly screen to be assembled.
4 x Lengths of Aluminium Frame
4 x Plastic Stakes
1 x Piece of Flyscreen Mesh
1 x Length of PVC Foam Spline
1 x Spline Rolling Tool
If accessories are ordered these may also be included for each flyscreen to be assembled
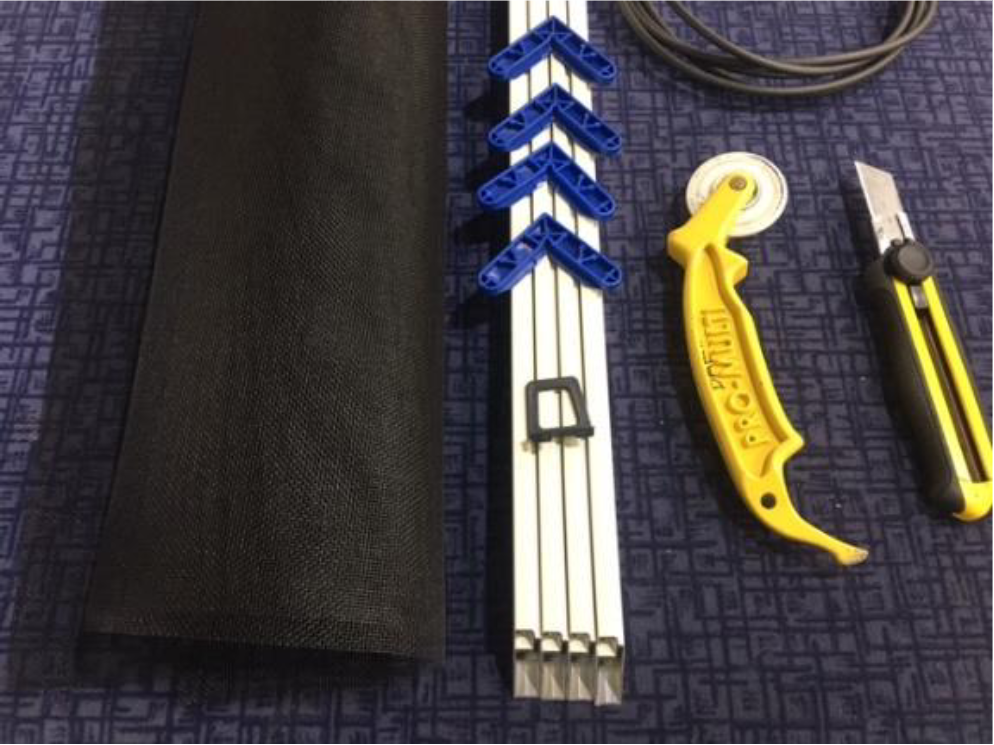
Step 2. - Tools
- You will also need the following tools
- Nylon hammer or timber mallet
- Tape Measure
- Blade knife / Box cutting knife
- Flat surface to work on.
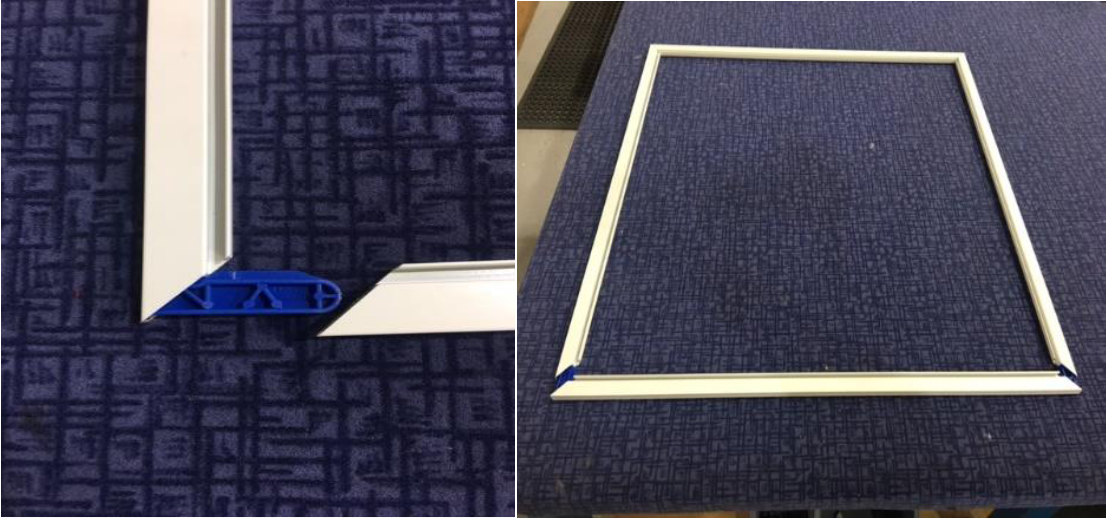
Step 3 – Assembly
- Check the dimensions of the extrusions are as per ordered.
- Lay the extrusions out on a flat surface with the spline groove facing up. The spline groove is the channel in the extrusion into which the spline will be rolled.
- Join the first three lengths of extrusion using a corner stake sequentially bringing the mitred corners together with a hammer or mallet. You should now have one piece of extrusion and 2 corner stakes remaining. Place the 2 last corner stakes into both ends of the final extrusion and then close off the frame bringing all pieces together. The frame will then be complete. Measure from opposite corners to ensure the frame is square. If not gently force the frame by hand until it is. See picture sequence for clarity.
- Lay the mesh over the assembled frame with the weave pattern square to the frame.
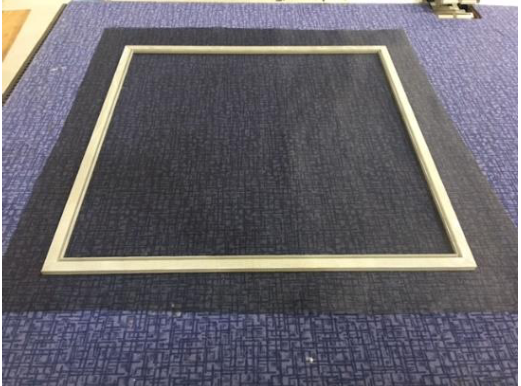
- For non-metallic meshes, starting at a corner, gently push the spline into the spline groove using the wheel of the spline roller tool and trapping the mesh inside the channel. Don’t worry about the mesh overhang as this will be trimmed off at the end of the process. The heel of the spline roller tool can be used to really get the end of the spline into the corner.

- Continue by rolling the spline into the spline groove along one edge. Hold the mesh with your free hand to stop it from moving too much and getting out of square. When you arrive at the corner work the spline into the corner using the heel of the tool again before continuing.
- Ensure that if you are using a lifting tab, that it also gets rolled in on the appropriate edge.

- On the final edge, pull gently on the mesh as you roll in the spline to give the mesh some tension. This will make the mesh nice and taut.
- If it’s not coming lout as you’d like, now is a good time to simply pull the spline out of its channel and try again.
- Once the mesh has been splined into place, simply trim the excess using a box cutter or similar knife. The easiest way to do this is by angling the blade and cutting the mesh just above the spline inside the spline groove.

- Take a deep breath, you are done! Congratulations!!
For metallic meshes, the method is much the same, however the mesh needs to be gently creased into the spline groove using the spline roller wheel PRIOR to applying the spline. Failure to gently work the mesh first may lead to the mesh tearing which we want to avoid.
How To Install Your Fly Screen
Here at Flyscreens in a Box, we take the mystery out of flyscreens and help the consumer choose, make and instal their own flyscreens. Installing flyscreens is straightforward and this handy guide will help you through the process based on the installation type.
Flyscreens are usually mounted either face fit, loose fit, or track fit, with differences in installation as follows.
1. Face Fit Mounting
- This is the simplest form of mounting and assumes there is a flat surface available against which to mount the fly screen. For face fit mounting, swivel clips are the easiest accessory to position and retain the screen.
- Place the screen against the surface to be mounted as evenly as possible around the perimeter of the screen. Ensure there are no gaps evident.
- Mark the position of the swivel clips along the bottom edge and the vertical sides of the screen. For larger screens, use two swivel clips along the bottom edge. Once the clip positions are marked, remove the screen from against its mounting face
- Screw in the swivel clips along the bottom and vertical edges.
- The screen can now be returned to its position and the swivel clips are turned to catch and hold the screen I place.
- Now mark the position of the swivel clips along the top edge of the screen, instal the clips and lock them into place.

Pro Tip
If the screen is face mounted into a rebate, follow the same process but use the swivel clips with the shallow offset or use plunger pins as per the loose fit mounting instructions.
2. Loose Fit Mounting
- In this application, the screen is fitted to an internal edge of a window frame. There are many ways to fit flyscreens in this application. One of them is to use plunger pins.
- A plunger pin is simply a plastic location pin which gets installed into the frame of a flyscreen.
- To instal a plunger pin simply drill 2 holes on each vertical side of the flyscreen all the way through the frame. The holes should match the diameter of the plunger pin.
- Now put the flyscreen in place and using the frame holes as guides, drill further into the window frame deep enough to contain the plunger pin.
- Next push the plunger pins by hand into position to secure the screen.
- See diagram and photo for clarity.
- Usually, plunger pins are used along vertical edges only to allow easy removal of the screen for cleaning and maintenance.

3. Track Mounted Fitting
- Track mounted fitting is by far the most common method of installing flyscreens. It is also the trickiest in that the flyscreen is ACTUALLY larger than the hole it will be installed into if measured correctly. This is because a portion of the flyscreen will be inside its mounting track.
- If there are no tracks on the sides for the flyscreen, simply lift the screen as far as it will go into the upper track, and if correctly measured the bottom of the screen will have just enough clearance clear the lip of the bottom track. Then simply let the screen drop into place.
Pro Tip
- If there are tracks along the sides into which the screen will go then, place a corner of the screen into the top track and a corner of the screen into the side track two thirds of the way along to their final position. See the red and green arrows in the photo. Now gently rotate and lift the screen and guide these two corners to travel along their respective tracks. See the blue and black arrows in the photo. With a final nudge and attitude adjustment, the screen will pop into the desired position and using the lift tab can be evened up into the side tracks.

- To remove screens that are track fitted all round simply reverse this procedure but begin by pushing the screen as high and as far as possible into the top track and whichever is the deeper side track. This will free up one corner of the screen allowing the screen’s removal.
How To Choose the Best Fly Screen Mesh
We all know the importance of keeping insects and pests out of our homes and businesses. Flyscreens are a great way to achieve that, and there are many different types of mesh available for different applications. Flyscreens come in a variety of different mesh types, and each one has its own unique benefits. When choosing the right mesh for your flyscreen, it is important to consider the type of insect or animal you are trying to keep out, as well as the durability and strength of the mesh. Doing so will ensure that your flyscreen is effective and long-lasting. .
At Flyscreens in a box we have a few types of mesh you can choose from. Typically they are either made of different materials or they are woven to be finer or coarser i.e. they have smaller or larger holes.
So let’s get into it.
Our meshes are:
- Fiberglass Mesh
- Midge Mesh
- Pet Mesh
- Aluminium Mesh
So which one??
- Bushfire Safety
Australian Standards requires homes in bushfire prone areas to screen windows and doors with mesh materials suitable to their level of risk. This risk is measured for each site in Australia with a BAL ( Bushfire Attack Level ) rating from LOW meaning Very Low risk to FZ meaning Flame Zone.
To choose the right flyscreen mesh for your screen, first obtain the BAL rating for your location. Local councils and fire authorities can assist. Once you have that, refer to the table below to make your choice. Only the options in green are suitable for your location.

Please note the Bushfire Regulations and Falling from Heights prevention are part of the Australian Standard and are therefore mandatory, whereas all other choices in this guide are recommendations only.
Hope this guide has helped but if you’re still unsure, drop us an email with your questions. We’re only too happy to hear from you.
Happy Screening!!
FAQs
How long will it take to arrive?
Around 10 Business days.Is it really as easy as you say to install?
Yes! But if you are still having trouble you can refer to our informational videos for a more guiding tutorial.Can you make Fly Screens larger than 1795mm?
Unfortunately no, shipping items above 1800mm incurs freight surcharges making it too expensive to ship.Do I need the Spline roller?
We strongly recommend purchasing the spline roller to make the installation a lot smoother and minimise the risk of piercing the mesh with other alternatives.How do I clean a flyscreen?
To clean a flyscreen, remove it from the window or door frame and use a damp cloth or sponge to wipe away any dirt or debris. Avoid using any harsh chemicals or abrasive materials which could damage the mesh.Are flyscreens effective at keeping out insects?
Yes, flyscreens are an effective way of keeping out common flying insects such as flies, mosquitoes, and moths. However, they are not completely foolproof and some smaller insects may still be able to get inside.How long will it take to install?
Times can vary depending on the size of the flyscreen. However it should take around 10-20 minutes.What is a spline roller?
A spline roller is a tool used to secure the mesh to the frame of a fly screen. The tool is used to roll a thin plastic cord (called spline) into a groove in the frame, which holds the mesh firmly in place.